Image Editor
With Infinity's inbuilt image manipulation tools, it is now possible to perform various functions such as flipping, cropping, resizing, rotating, and colour manipulation on the images in the Infinity Image Library. It is also possible to add text, lines and shapes, if required.
|
Note: This tool was created to enable basic image manipulations to be accomplished without the need to load it into an external (and expensive!) art package. For more complex manipulations however, an external art package may still be required. |
The picture below shows what the Image Editor looks like once an image has been selected and opened for editing.
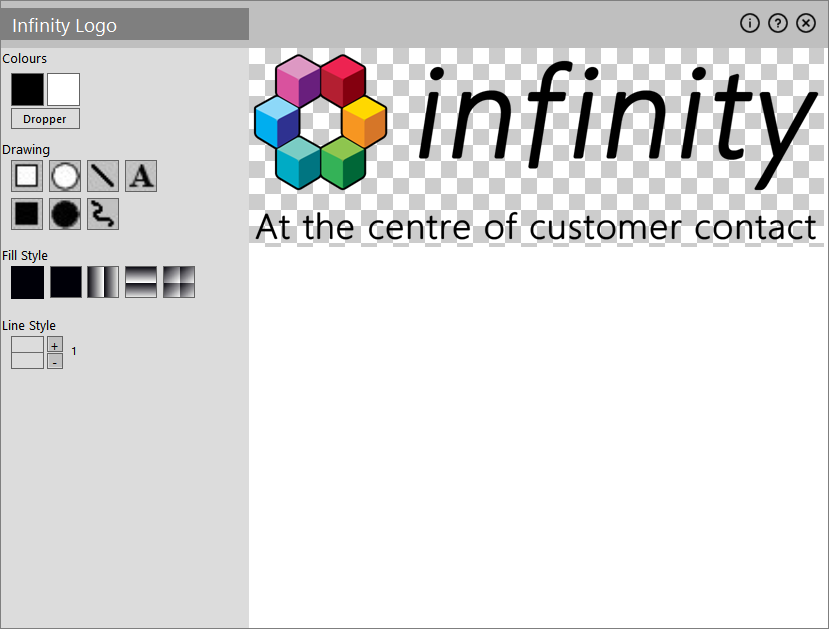
The panel on the left contains the drawing tools and the panel on the right is the image area.
Drawing Tools
The drawing tools can be found in the left-hand panel of the screen.

From here you can select the colours to work with and use different drawing tools to draw lines, shapes and add text.
You can select the background and foreground colours to work with in two ways. In the Colours box, you will see two large coloured boxes. The left-hand one is the foreground colour and the right-hand one is the background colour. Click either box will display a colour picker. Click the colour you wish to use (or define a custom colour) and click OK to select the colour.
Alternatively, if you can see the colour you wish to use on the image already you can use the 'Dropper' tool. Click the Dropper button and the cursor will change into a crosshair. Move the cursor over the image and place it over the required colour. Now click the left-hand button to apply that colour as the foreground colour or the right-hand button to apply that colour as the background colour.
In the Drawing box, you will see seven different icons which are (from left to right and top to bottom) Rectangle, Filled Rectangle, Line, Text, Ellipse, Filled Ellipse, and Freehand drawing. To change the thickness of the lines, use the plus/minus icons in the Line Style box BEFORE drawing your shape.
-
Drawing Boxes and Ellipses: To draw an outline ellipse or rectangle, click the Ellipse or Rectangle icon and the cursor will change into a crosshair. Place the cursor anywhere on the image and click and hold the mouse button whilst dragging the mouse until your shape is the required size (don't worry about its exact position just yet). Now release the mouse button and you will see a shape of the size of selected appear next to the mouse cursor. Move it around until it's in the required position and click either the left mouse button to draw your shape with the foreground colour, or the right mouse button to draw it in the background colour.
Drawing a filled ellipse or rectangle is the same except the Fill Styles box comes into play. Before drawing your shape, select the appropriate fill style. The four options are (from left-to-right, top-to-bottom) solid, vertical gradient, horizontal gradient or forward-diagonal gradient.
When using a gradient fill, the starting colour for the gradient is the foreground colour and the final colour for the gradient is the background colour.
-
Drawing Lines: Click the line icon and the cursor will change into a crosshair. Place the cursor anywhere on the image and click and hold the mouse button whilst dragging the mouse until your line is of the required angle and length (don't worry about its exact position just yet). Now release the mouse button and you will see the line appear next to the mouse cursor. Move it around until it's in the required position and click either the left mouse button to draw your line with the foreground colour or the right mouse button to draw it in the background colour.
- Add Text: Click the text icon will display the Text Input box. Type your text into the box, select your font, and whether or not you wish a drop shadow to appear under your text. Click to OK button and you will be returned to the image. The mouse cursor will now be a crosshair - position the text where you would like it and click the left-button to draw the text in the foreground colour and the right-button to draw the text in the background colour.
-
Freehand Drawing: Click the Freehand Drawing icon the cursor will change into a crosshair. Move the cursor over the image and hold down either the left or right mouse button (foreground or background colour) and move the mouse SLOWLY whilst holding the button down to draw. Once you release the button, you will need to click the Freehand Drawing icon again to draw some more.
Image Manipulation Tools
Right-clicking anywhere on the image displayed in the main editing window will bring up a context-menu with all of the available options:
These two options are essentially the same except that copy will leave the original selection in the image whereas cut will remove it.
Select this option if you want to copy/move a portion of the image and either paste it somewhere else or remove it entirely. After selecting the option, you'll notice that the mouse cursor will change into a crosshair. Place the cursor at the top-left of the rectangle you wish to cut/copy and hold the mouse button down whilst you drag the cursor to the bottom-right of the rectangle you wish to select.
Upon releasing the mouse button, the selected area will be removed from the image (unless you're copying in which case it will not be removed) and the opaque selection will appear next to your mouse cursor allowing you to place it accurately. Move the selection to where you wish to place it and click the mouse button to drop.
If you simply wish to remove that section from the image, you can simply click anywhere on the grey bar on the left hand side of the screen instead of dropping it on the image itself.
You can flip the entire image either horizontally or vertically. To do this, simply hover over the 'Flip' option and select either 'Horizontal' or 'Vertical' from the flyout menu.
Select this option if you want to remove the unwanted outer parts of an image and leave only the part of the image inside the selected area. After selecting the option, you'll notice that the mouse cursor will change into a crosshair. Place the cursor at the top-left of the rectangle you wish to crop and hold the mouse button down whilst you drag the cursor to the bottom-right of the rectangle you wish to select.
Upon releasing the mouse button, any part of the image OUTSIDE of the selected rectangle will be removed and just the portion of the image inside the rectangle will remain.
Select this option if you wish to rotate the image by a specified degree. Select the 'Rotate' option from the menu and, on the dialog box that appears, select the required degree of rotation.
Click the OK button to continue. Please note that rotating the image will change the overall size of the image to accommodate the rotation.
Changing the opacity of an image can be useful if you want to create a 'watermark' effect where the image looks like it is part of the background.
Select the 'Opacity…' option from the menu and you will be presented with a slider that allows you to set the degree of opacity to apply to the image. You would normally set this slider somewhere in the middle (zero) to make the image semi-transparent.
Click OK to apply the opacity to the image.
Hover over the 'Effects' menu and select either 'Blur' or 'Pixellate' from the flyout menu. After selecting the option, you'll notice that the mouse cursor will change into a crosshair. Place the cursor at the top-left of the rectangle you wish to crop and hold the mouse button down whilst you drag the cursor to the bottom-right of the rectangle you wish to select.
Upon releasing the mouse button, the blur or pixellating effect will be applied to the selected area.
Hover over the 'Effects' menu and select 'Grayscale' from the flyout menu. The image will now be converted to a black-and-white image.
Hover over the 'Adjust' menu and select 'Hue/Saturation/Lightness' from the flyout menu. Adjusting these values gives you control over the colours in the image.
In the example pictured, the Hue setting is modified to change the colour of the flag from gold to purple.
Clicking OK will apply the new Hue/Saturation/Lightness values to the image.
Select the 'Set Colour Transparent' option from the menu and you'll notice the mouse cursor will change into a crosshair. Clicking on any pixel will make all pixels of the same colour transparent.
Allows you to undo your last action.