Import Data
The ability to import data into Infinity projects is a pretty important one, so Infinity allows you to import data from a variety of sources. You can also update existing columns with fixed values at the same time as importing, if required.
To access the Import editor, select the following options from the menu:


The Import editor will now appear on an editing tab.
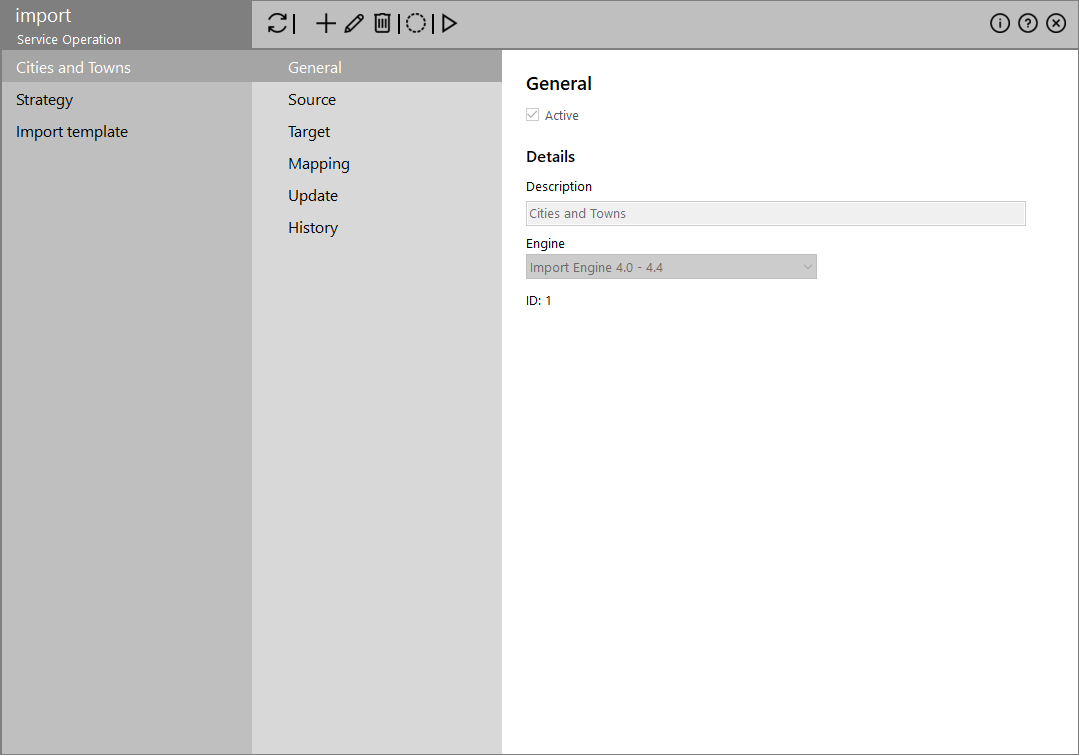
The left-hand side of the screen is a list of all the currently defined Imports. The ![]() icon updates the results by also showing (when selected) or not (when deselected) the inactive imports.
icon updates the results by also showing (when selected) or not (when deselected) the inactive imports.
The right-hand side of the screen shows the Import parameters grouped in several tabs.
Actions
The following actions are available for the imports through the toolbar on the right panel:
| Icon | Description |
|---|---|
|
|
Updates the list of imports |
|
|
Adds a new import to the system by providing the Import parameters |
|
|
Allows you to modify the Import parameters of the selected import |
|
|
To delete a selected import from the list |
|
|
Save your changes |
|
|
Toggles displaying the inactive imports |
|
|
Executes the import by launching a wizard in a separate tab window. Note: In case of a new import you have to provide a descriptive name in the Details text box and save before running the import. |
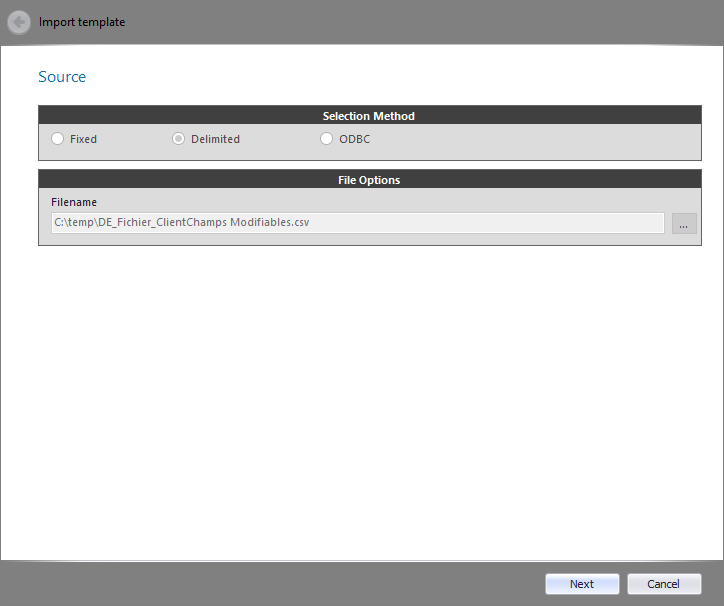
Import wizard
The import wizard has the following steps:
It displays the selection method and file options as defined in the 'Source' tab. Click the Next button to continue.
It displays the source/ target details and the data mapping to database fields.
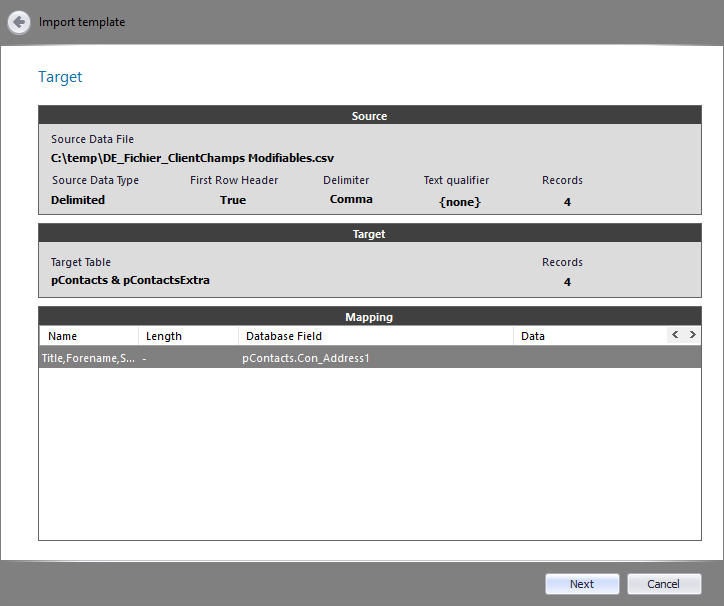
Click the Next button to continue.
In this step enter a short Import Note in the text box.
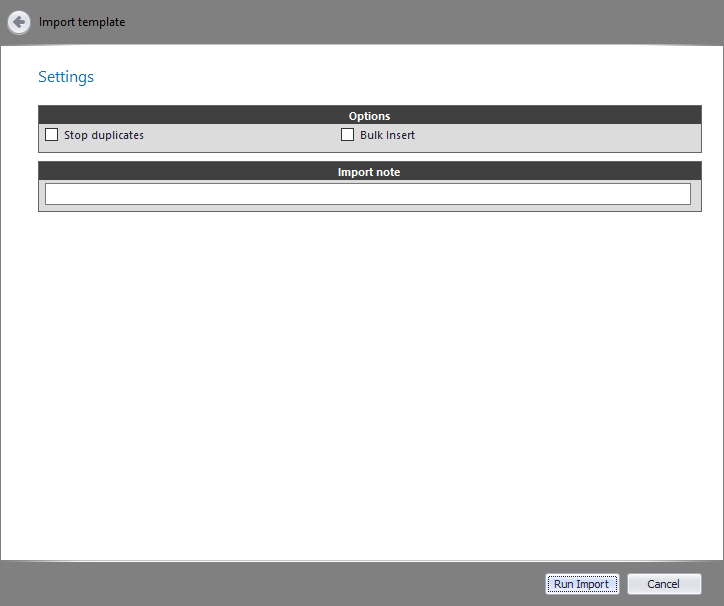
Click the Run Import button to execute the import.
A final report summary for the import .
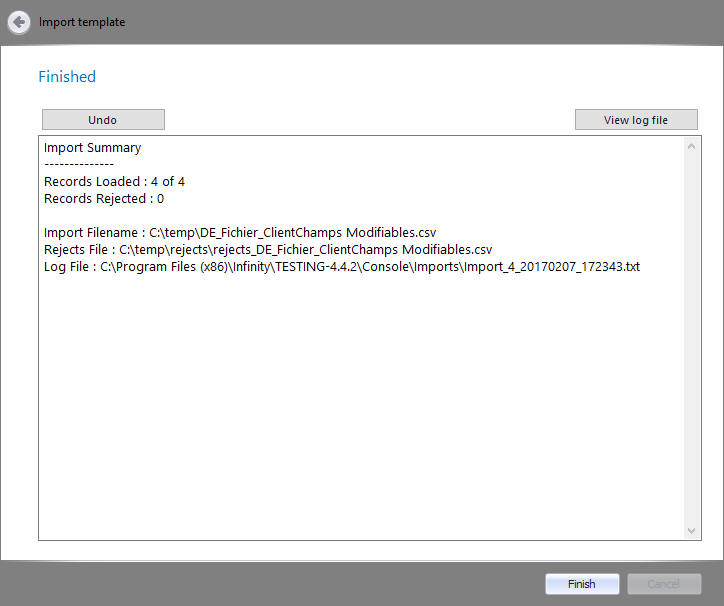
Click the Finish button to close the wizard.
Import parameters
The import parameters are spread over the following tabs:
- Active (checkbox): It flags the import active when checked.
- Description: A meaningful description for the import parameters
-
Engine (drop-down list): Selecting the database engine between 4.0-4.4 and 4.5 defines the format of the database. In versions up to 4.4 you can map an input field to only one target column, while in 4.5 you can map an input field to multiple target columns.
Important: Making the wrong engine choice will prevent users of the 4.5 console from using a 4.4.x import service and vice versa.
Note: This option can only be set during the creation of the Import. Editing an import later shows the Engine as a read-only field.
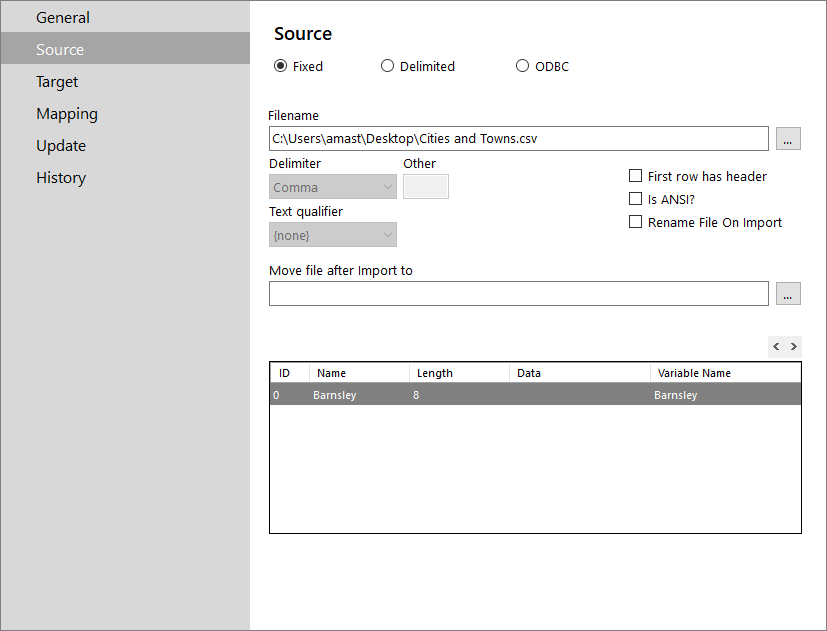
The source tab is where the details of the source datafile are defined. The originator of the data should be able to inform on the source type being one of the following:
-
Fixed: Source file is a text file in a fixed-width format. The File Options section is displayed.
-
Delimited Source file is a text file in a delimited format. The File Options section is displayed.
- ODBC: Source data is in a SQL Server table, Microsoft Access table, Microsoft Excel worksheet, or a dBase-compatible (.DBF) format. The ODBC Options section is displayed.

- Filename: Type the location of the file or click the ellipsis (…) to select it through the file picker.
- Delimiter: Select the appropriate delimiter or Other for specifying a custom one (available only to Delimited option)
- Other: Type a custom delimiter
- Text Qualifier: Type a text qualifier if appropriate
- First row has header: Should be checked if the first row of the file contains a header, to ensure that this row is not imported.
- Is ANSI: When checked the file be created will be ANSI compatible
- Rename File on Import: When checked it will automatically rename the file after processing to make sure it doesn't get reimported again
- Move file after import to: Type the location of the folder the file will be moved to or click the ellipsis (…) to select it through a dialog box.
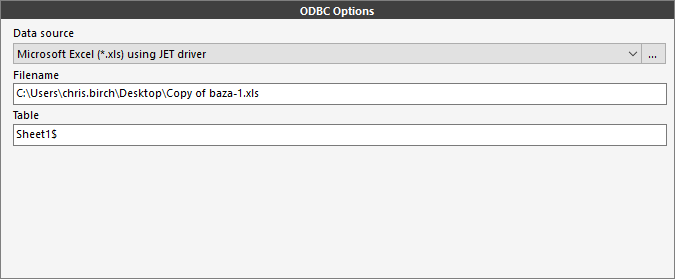
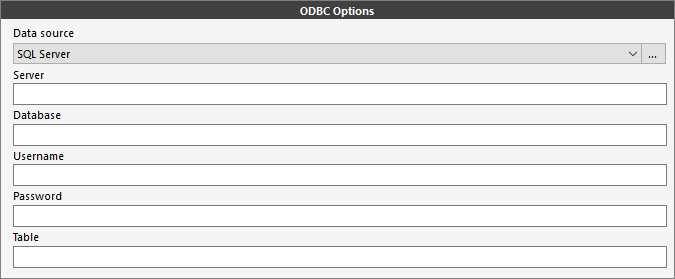
Depending on the Data Source type selected different parameters will need to be further specified.
On the lower section of the tab there is a table showing the fields that are imported from the selected source. Depending on the source type you can make some changes to the column widths and headers:
| Source Type | Allowed Changes |
|---|---|
| Fixed length with header | Column width |
| Fixed length without header | Column width and column headers |
| Delimited with header | None |
| Delimited without header | Column headers |
| ODBC | None |
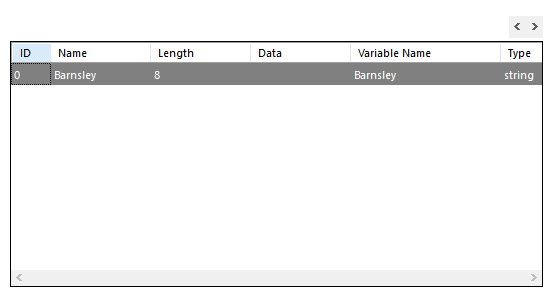
In this section you can create computed columns from the original dataset by using fixed or dynamic values for the target field.
- Fixed values: For example, if you have one column with 'First name' and a second column with 'Surname' you can create a fake 'Full name; column.
- Dynamic values: You can use a pre-process function to manipulate a column, create new variables and update existing column values (see Pre-process tab).
Note: This section is activated only if the import engine is set to 4.5 in the General tab.

This tab contains a Function Builder that allows you to define a dynamic value for a computed column created in the Source tab. You can also use pre-process function to convert a text source field into a computed date field.
- Strip invalid characters, e.g. keeping only digits and '+' sign (convert 0121-111-2222 to 01211112222)
- Convert international phone number to "diallable" format, e.g. replacing +441211112222 with 00441211112222 for dialling to UK from abroad.
- Check for "real" phone number using a regular expression
- If field value is 'xyz', don't upload record (report as ignored)
- In pContacts, if field value is 'abc', mark as Barred (and report as barred)
- In pContacts, if all phone numbers are empty, set calloutcome as "Invalid" and sub-calloutcome as "no number"
- Convert enum (string to int, or int to string) for converting Male/Female to 0/1 or to M/F
- Replace "NULL" strings with DBNull value or with empty string
- Convert string to date using a specific format (Date.ParseExact)
- Combine multiple source fields (FirstName + SurName to generate FullName)
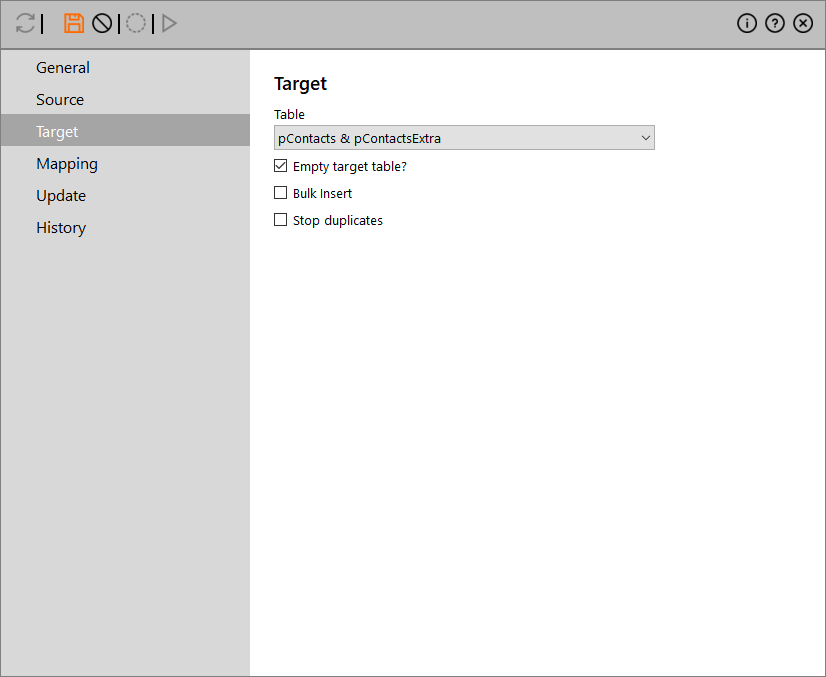
In this tab you select the appropriate table from the Table drop-down list. The following options can be defined:
-
Empty target table (checkbox): Enabling this will delete ALL DATA currently in the table before importing the new data.
Tip: When you import new clients to call, you want them added to the table, so you leave the checkbox empty. But when you import a new list of products to replace the current list of products, you fill the checkbox so that only the new products appear.
-
Bulk insert: This is an SQL option that loads data from a data file into a table using minimal logging for achieving better performance than INSERT statement [in 'Source' tab on v4.4].
-
Stop duplicates (checkbox): When enabled duplicate entries in Con_Phone1, Con_Phone2 and Con_Phone3 columns are not imported.
Note: This option is available only when you select the [pContacts & pContactsExtra] table.
 How it works
It compares the Con_Phone1, Con_Phone2 and Con_Phone3 columns against all existing records in the database. If an existing matching record is found in the database, then the record will be imported with Con_HierarchyKey = 99 and automatically excluded during the calls list creation process.
Note: This option is hard-coded into the software being only used for the 3 phone columns.
If you wish to skip importing duplicate records based on different columns then you can create directly on the SQL server a UQ_*** constraint. this way you will actually prevent the record from being inserted completely having more control over the necessary checks. A sample constraint might look like this:
CREATE UNIQUE NONCLUSTERED INDEX [UQ_pContactsExtra_ContractID] ON [pContactsExtra] (ConExt_ContractID) WITH FILLFACTOR = 90

This is where the data being imported is mapped to the table selected in the Target tab and columns that they are intended for. If the file being imported from has a header row then the big textbox on the top displays the source columns names that will be mapped. And if these names are the same as in the Target table it is intended for, the Automap button can be used to automatically map the imported data to the right column in the target table.
The actual mapping is done on the table with the target fields using one of the following methods:
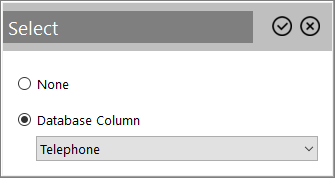
-
By clicking the ellipsis (…) button of a field: Select on Database Column in the drop-down list and click the
 button to assign the value.
- Drag and drop a source column name from the textbox on the top to the value field of the target.
Tip: You can map a source field to multiple target fields.
When enabled, the Hide items already mapped checkbox hides the fields that are already mapped.

It is possible to update columns in the Target table with fixed values as data is being imported. This allows for data that isn’t in the source file to be included against an imported record. Just select the column to be updated and the value to update it with. Up to five columns can be updated.
The following drop-down lists allow you to allocate workflow processes to the import definition:
- Run after each record loaded: Choose a workflow process to run automatically after each record is loaded into the database.
- Run after data loaded: Choose a workflow process to run automatically once all the data has been loaded.
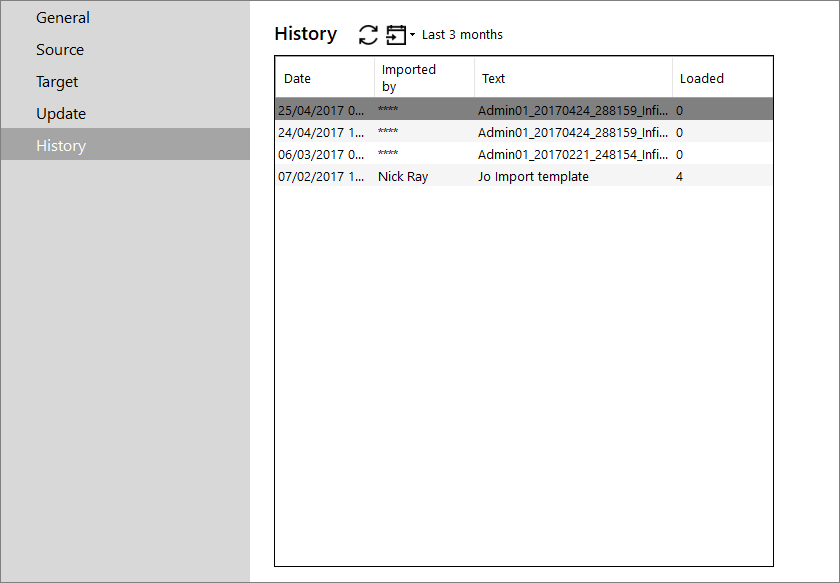
This displays a list of previous imports performed on this definition. You can use the Filter ![]() toolbar icon to select a different time period from the drop-down list.
toolbar icon to select a different time period from the drop-down list.