Namespace Editor
The namespace editor allow you to administer a number of system wide dialler functions for both inbound and outbound calls including user accounts, queues, default outcomes and dialler messaging through a number of tabs.
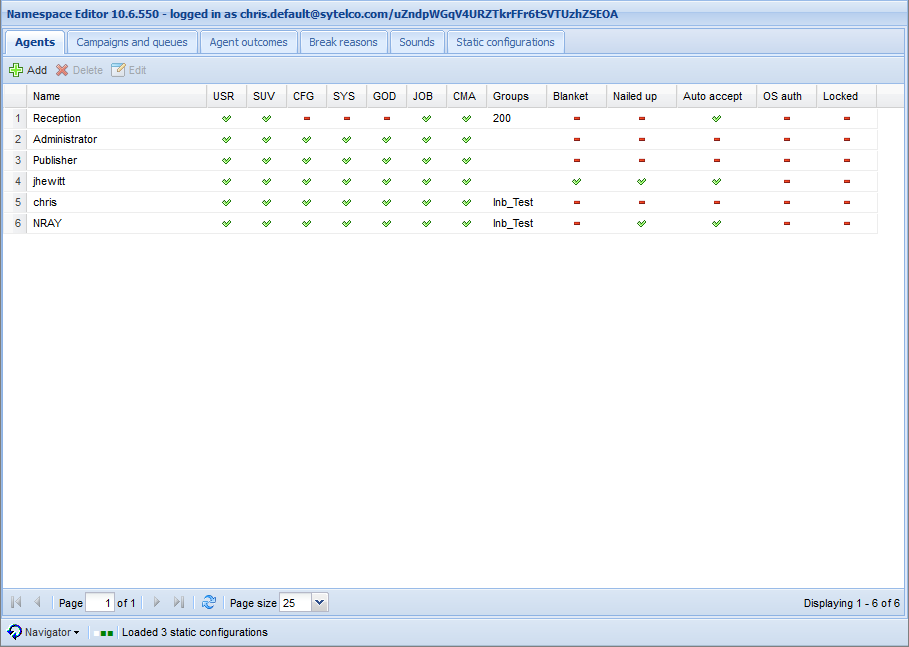
All the available functions can be accessed through a series of tabs on the top:
This is the default tab displaying an overview of the current dialler accounts on the system.
The following agent actions are available:
-
 : Allows adding a new agent to the system
 -
 : Deletes an agent
 -
 : Allows modifying the data of an existing agent
Upon adding or editing an agent, the following configuration window is used:
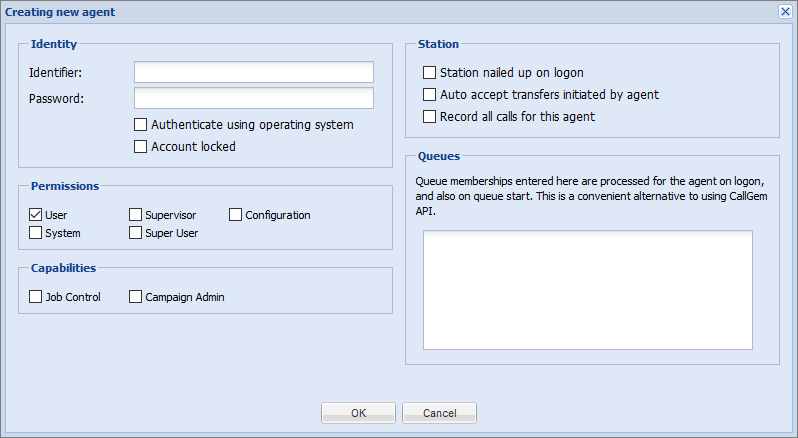
The following fields are used (per section):
Identity
- Identifier: The username of the agent
- Password: The password of the agent
- Authenticate using operating system (checkbox): Checked if OS authentication is being used
Permissions
- User: Regular call centre agent having permissions for all agent functions
- Supervisor: Additionally to the user's permissions he can monitor/ coach and can issue 'Kill Agent' (remove another active/ logged in user from the dialler) and 'Move Agent' (move other agents to different campaigns) commands
- Configuration: He has access to configuration (not yet implemented)
- Super User: He has access to all roles
- System: He has currently the same permissions as 'Super User' (reserved for future use)
Capabilities
- Job Control: Start and Stop campaigns, Reload, Suspend
- Campaign Admin: All campaign functions
Station
- Station nailed up on logon: When checked, the dialler will call the agent on his DDI (Direct Dial In number) once he logs in, so his is ready to accept calls. If unchecked, the dialler will call the agent each time there is a call to connect to him.
- Auto accept transferred initiated by agent: Checked if this agent will automatically accept transfers from another agent i.e. a blind transfer rather than a supervised transfer
- Record all calls for this agent: Checked if all calls for this agent are being recorded
Queues
- Group membership: Lists all queues to which the agent is registered
Set the identifier as the users Infinity login ID followed by their password in the password section. Normal dialler users just need to be flagged as User under permissions. When the logging in to the project under console they will either be automatically logged in if the details match or be prompted for to enter details.
The user can now login to dialler based campaigns.
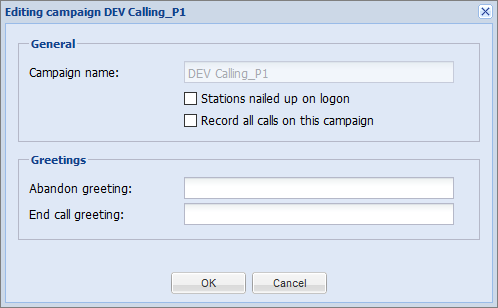
The Campaigns and queues tab lists all current campaigns configured for the current tenant.

Click a campaign to show all queues associated with that campaign.
Double-clicking a campaign or selecting it and clicking the ![]() allows you to edit the its details.
allows you to edit the its details.
|
Important: The |

Due to the amount of configuration options available for inbound including full IVR script routing the Inbound queue setup is covered in detail in the separate Softdial user guide.
Campaigns added to the system use a default set of outcomes and it is here that you can administer this list as required.
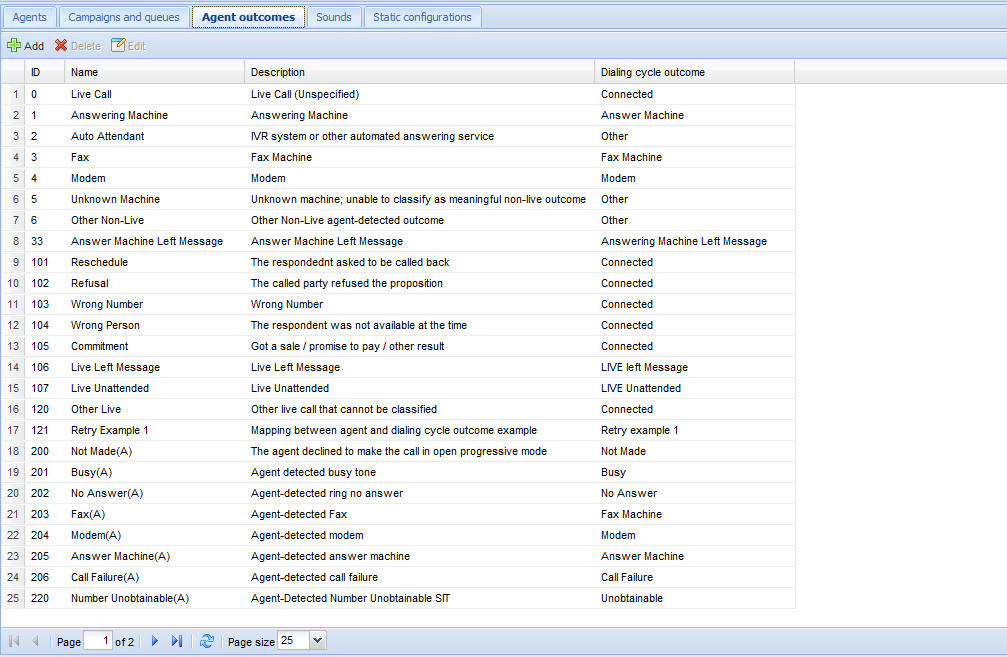
Click ![]() to add a new Agent Outcome for the current tenant. An existing Outcome may be edited or deleted by selecting the Outcome and clicking the appropriate button on the toolstrip.
to add a new Agent Outcome for the current tenant. An existing Outcome may be edited or deleted by selecting the Outcome and clicking the appropriate button on the toolstrip.
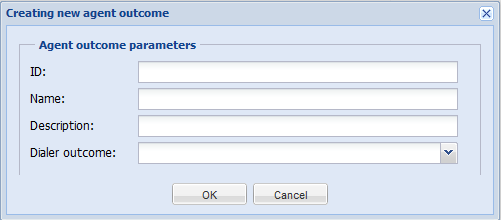
The ID must be unique for the tenant, Name and Description are usually the same (used in Reporting), the dialler Outcome is selected according to the mapping required. The Dialler Outcome is the one that is used by Campaign Manager to determine the retry settings to be used for this outcome. There are three dialler outcome values that must not be mapped to Agent Outcomes; 0, 8 and 9. These outcome codes are used internally by the dialler.
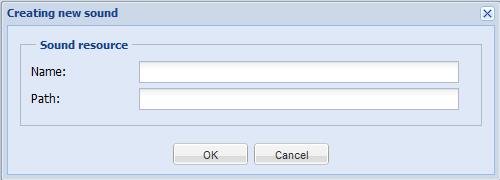
Select the Sounds tab to show the list of Sound mappings configured for the current tenant.
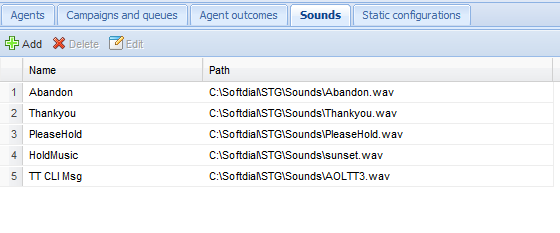
Click the ![]() Add button to add a new Sound mapping for the current tenant. An existing Sound mapping may be edited or deleted by selecting the Sound and clicking the
Add button to add a new Sound mapping for the current tenant. An existing Sound mapping may be edited or deleted by selecting the Sound and clicking the ![]() or
or ![]() buttons respectively on the toolstrip.
buttons respectively on the toolstrip.
|
Note: The path to the sound file must point to the server hosting Softdial Telephony Gateway and the .wav file must be in the following format: Bit Rate = 64kbps, Audio sample size = 8 bit, Channels = 1 (mono), Audio sample rate = 8khz Audio format = CCITT A-Law |
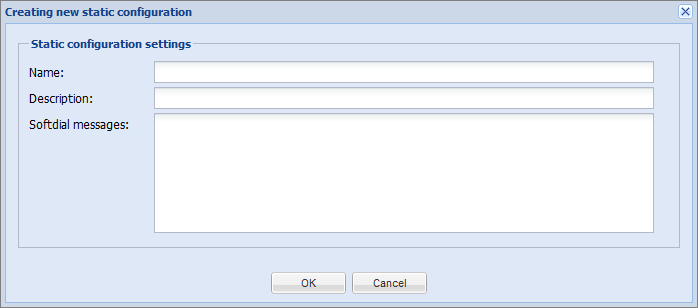
Select the Static configurations tab to show the list of Static configurations configured for the current tenant.

The screen above depicts the standard static configuration to log on the Reception agent to the system campaign.
To add a new configuration click the ![]() button, then enter a Name (ID) and a Description then type the Softdial message for the required configuration.
button, then enter a Name (ID) and a Description then type the Softdial message for the required configuration.