Infinity can utilise user-defined database tables (within a Project database) to enable third-party tables to be recreated and used, for example, as lookup tables in Scripts. You can also add/remove certain columns from the built-in tables that were designed to hold custom data not already catered for by Infinity’s default table structure.
To access the Table editor, select the following menu options:


The Table editor will now appear on an editing tab.
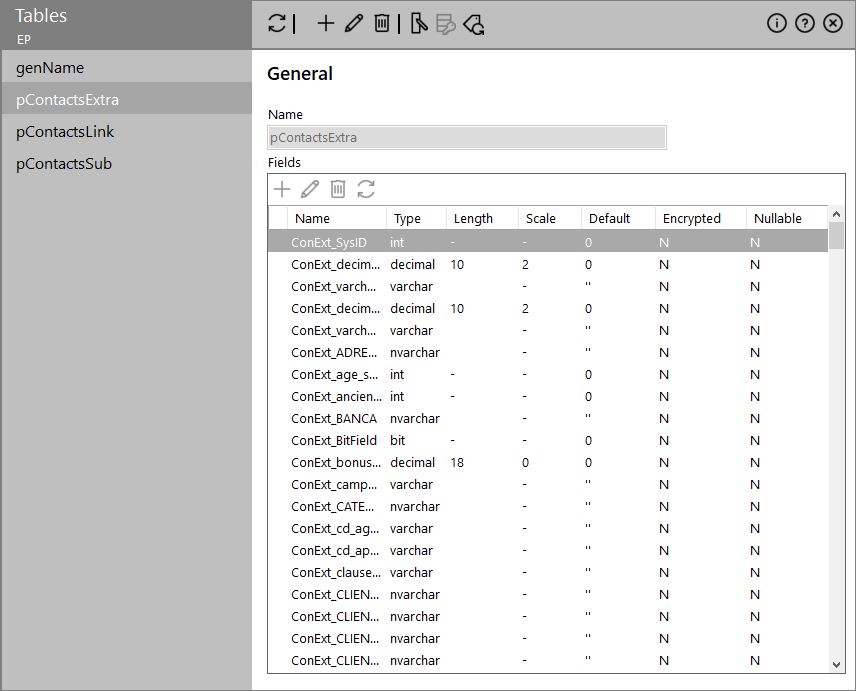
The left-hand side of the screen is a list of all the currently defined tables that can be edited and the right-hand side of the screen contains the editing panel. Some advanced options may also be visible in the left-hand panel, if permissions allow.
|
Warning: These are advanced options and should only be used if you know exactly what you are doing. Please see your Infinity contact for more details. |
-
 Define Returned Columns
This option allows you to specify the tables that will be loaded into the Script Designer, so they can be dragged into commands and functions. This a quick way of knowing which fields exist on which table.
Check the required tables and click the
 icon.
icon. -
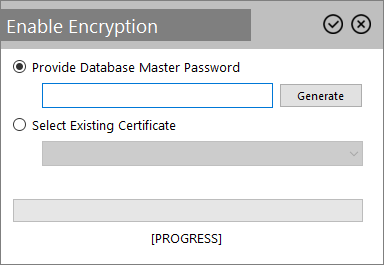
 Enable encryption
This option allows you to create the necessary certificates on the SQL server to allow it to perform SQL Side encryption/ decryption. Please refer to Database Encryption for more information.
Click the
icon when done.Note: This option is only available to users with full SQL Super Administrator rights.
-
 Rebuild SP's: Scans for any table that has encrypted fields and generate the matching selection procedure (with the routines to decrypt the data) for use in the script.
Note: This option is available only after the 'Enable Encryption' option is set.

Actions
The following actions are available through the toolbar:
| Icon | Description | |
|---|---|---|
|
|
Updates the list of tables | |
|
|
Add a new table by providing the following:
|
|
|
|
Edit the selected table by Managing Table Columns | |
|
|
Removes the selected table (with confirmation) | |
|
|
Stores your new table or any column changes | |
|
|
Define Returned Columns (see Advanced Options above) | |
|
|
Enable Encryption (see Advanced Options above) | |
|
|
Rebuild SP's (see Advanced Options above) |
Table Types
The tables list on the left contains some internal tables that are required by Infinity and cannot be removed. It is possible to add columns to these tables but certain columns cannot be edited because they are necessary for the correct operation of Infinity. Any other tables listed are user-defined tables.
- pContactsExtra: This table is related (in a one-to-one relationship) with the pContacts table. It is designed to hold client-specific data for the contact record it is related to. If, for example, the pContacts table holds a list of a company’s policyholders and a policy number needs to be held and referenced in a script, a column can be created in this table which can then be imported into via the Import Editor. See Import Data for more information about importing data into Infinity.
- pContactsSub: This table is related (in a one-to-many relationship) with the pContacts table. In a business-to-business campaign, this table would hold the individual contacts for the company listed in the pContacts table. In a business-to-consumer campaign, this table may not be used.
- pContactsLink: This table is related (in a one-to-many relationship) with the pContactsSub table. In a business-to-business campaign, this table would hold individual ‘cases’ related to the pContactsSub record in question. In a business-to-consumer campaign, this table may or may not be used.
The tables listed that are not Infinity tables have been defined by the user for specific use within the current project. These tables can hold any required information and are totally definable. Unlike the Infinity tables, they can also be removed if necessary.
Managing Table Columns
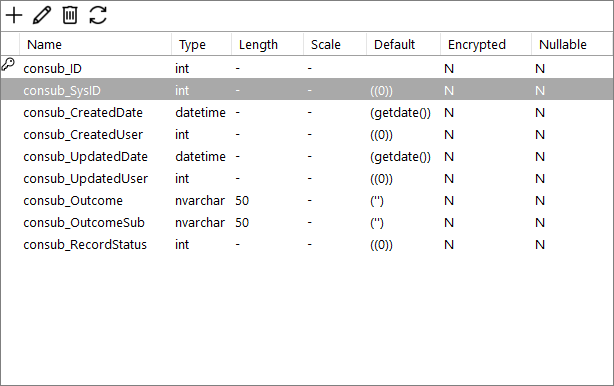
The main section of the Tables screen shows information about the columns of the selected table.
The following actions are available through the lower toolbar:
| Icon | Description |
|---|---|
|
|
Add a new column to the table by providing its parameters and then click the |
|
|
Edit the selected column (you can achieve the same by double-clicking the column) by modifying its parameters and then click the |
|
|
Removes the selected column (with confirmation) |
|
|
Reverts the grids to their previous state before any changes were saved |
Tip: To commit your column changes you have to click the ![]() icon on the top toolbar.
icon on the top toolbar.
Important: If you are editing an internal table there are certain columns that cannot be edited or deleted.
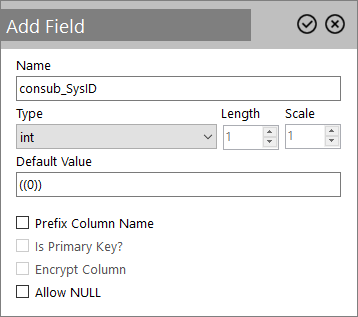
- Name: The name of the column; no spaces should be used
- Type: The type of the column, e.g. char, decimal, text.
- Length: The length of the column field
- Scale: The number of decimals places for decimal and numeric types
- Default Value: The default value of the column
- Prefix Column Name: When enabled the new column name will be "prefixed" with the first three letters of the table name
- Is Primary Key: Whether the column acts as the table's primary key
-
Encrypt Column: Whether the column will be encrypted
Note: For this option to be available you have to first activate Database Encryption.
- Allow Null: Whether a null value will be allowed for that column