Callmedia Campaigns
This screen allows you to manage a Callmedia Campaign and its parameters.
|
Tip: It is a common practice for Callmedia Campaigns to be assigned to Infinity Projects using a 1:1 relation, that is one campaign per project. |
To access Callmedia Campaigns, select the following menu options:


The screen appears in a new tab:
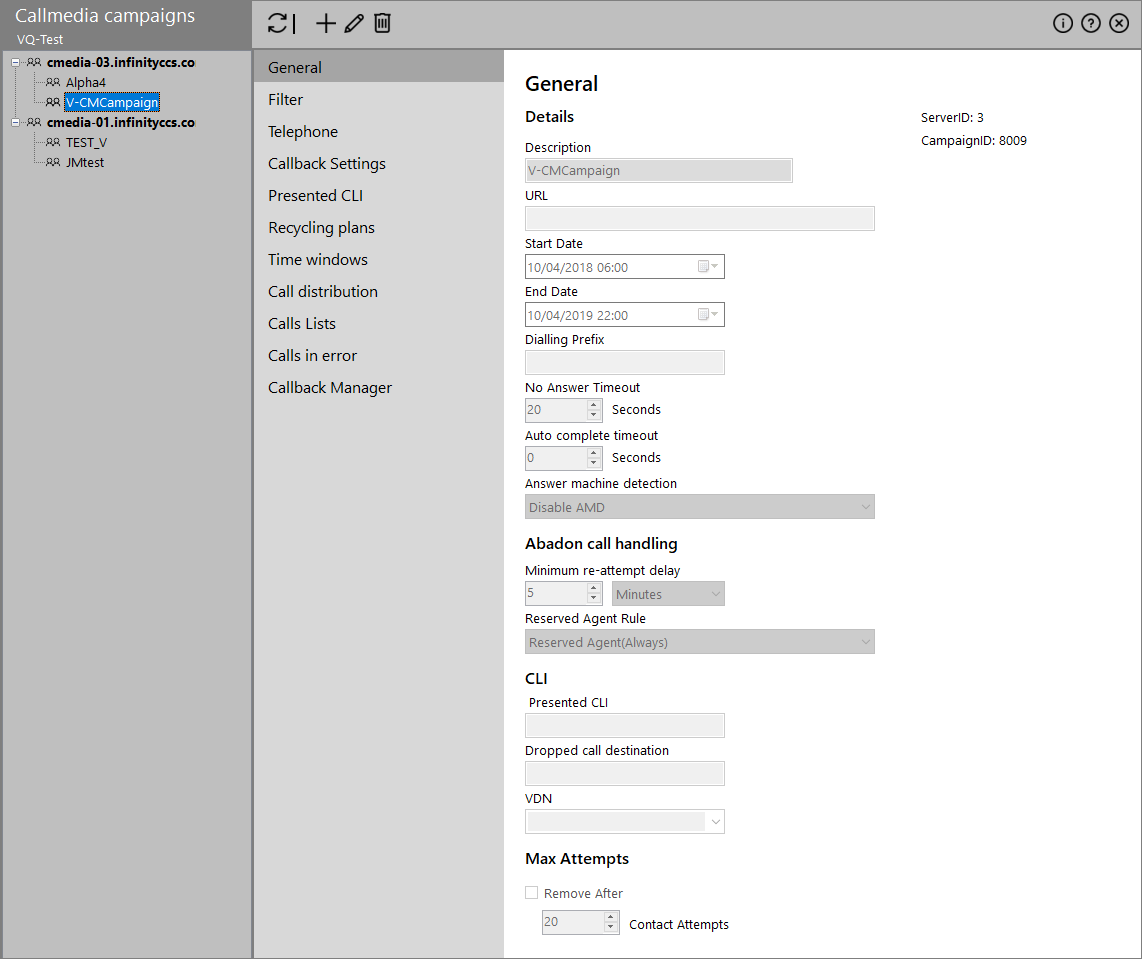
On the left it shows a list of the Callmedia Campaigns under the Callmedia CTI Server associated to the project. To the right an editing panel is available for managing the campaigns.
Project Allocation
Right-clicking anywhere in the left-side list panel provides you with the following options:
-
Allocate: Allows you to link one or more Callmedia campaigns to the current project by selecting them and clicking the
 icon.
icon.
- Deallocate: Unlinks the selected Callmedia campaign from the current project.
Actions
The following actions are available through the icons of the toolbar:
| Icon | Description |
|---|---|
|
|
Updates the displayed calls |
|
|
Adds a new Callmedia campaign by providing the required parameters. The new campaign is automatically allocated to the project. |
|
|
Modify the parameters of the selected Callmedia campaign |
|
|
Remove the selected Callmedia campaign from the project |
|
|
Commits your changes on campaign's parameters |
Parameter Tabs
The campaign's parameters lie in the following tabs:
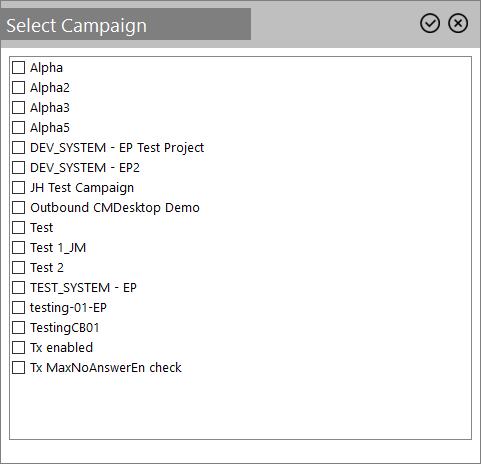
Details
- Description: A descriptive name for the campaign.
- URL: This should be either the URL of a web based Campaign (can be pasted from the browser once it is running the first page of the Campaign) or a string that will tell the front-end application what script / program to run.
- Start/ End Date: Used as part of the call selection process. If the Campaign is out-of-date then no calls for it will be selected for dialling.
- Dial Prefix: This informs Advance what digits should be dialled before the number associated with calls for the Campaign, this is normally 9 which is the standard number for obtaining an outside line, but additional numbers such as LCR, or CPS digits may be added here.
- No Answer Timeout: The number of seconds you would like an outbound call to ring for before being classified as not answered.
-
Auto Complete Timeout: The number of seconds that a call can be in the Wrap State before it is automatically completed. A value of zero (default) disables this feature.
Warning: Care must be taken when using Auto-wrap. If the agent wants to setup a scheduled callback, or to recycle a call then he has a set number of seconds to do this before the auto-wrap automatically completes the call. Once a call has been completed in this way it will not be called again.
- Answer Machine Detection (drop-down list): The Answer Machine Detection setting. Used only if AMD is enabled on your system.
Abandon Call Handling
If a call that was dialled predictively is answered and there is no agent available to take the call the dialler will abandon the call. The dialler reserves an agent for this contact the next time they are called to prevent another abandoned call to that person.
- Minimum re-attempt delay: This specifies the minimum time the dialler should wait before making another attempt to dial a call that has been abandoned. This can be set from 5 minutes (the default) up to 21 days.
- Reserved Agent Rule: Select one of the following options:
- Reserved Agent (Always): Calls will remain in the abandoned state until they are successfully called or removed. This means that an agent will always be reserved to make the call. This is poorer for dialler performance, but is the best behaviour because a call to a person will never be abandoned more than once.
- Reserved Agent (72 hours): After a restriction period, which is normally 72 hours, the call will be marked as a normal recycled call and will be dialled again without the need to reserve an agent. This is better for dialler performance, but does run the risk that another call attempt to the contact may result in further abandoned calls.
CLI (Caller Line Identity)
- Presented CLI: The telephone number to present with outbound calls from this Campaign
- Dropped call destination: A directory number where the call will be transferred to in the event of a predictive abandoned call
-
VDN: A vector directory number is an extension on an automatic call distributor that directs an incoming call to a "vector".
Note: Since Callmedia's CU40, the campaign must be assigned to a VDN, which will be used for dialling.
|
Important: With all CLI presentation configurations, there are a number of factors that control whether or not the desired CLI will be presented to the customer, including whether or not the telephony network allows the CLI to be presented. It is vital that this feature is thoroughly tested when a new Campaign is setup, or any of these settings are modified. |
Max Attempts
- Remove After: Removes a contact after a total number of contact attempts, which is the total of attempts for all numbers.
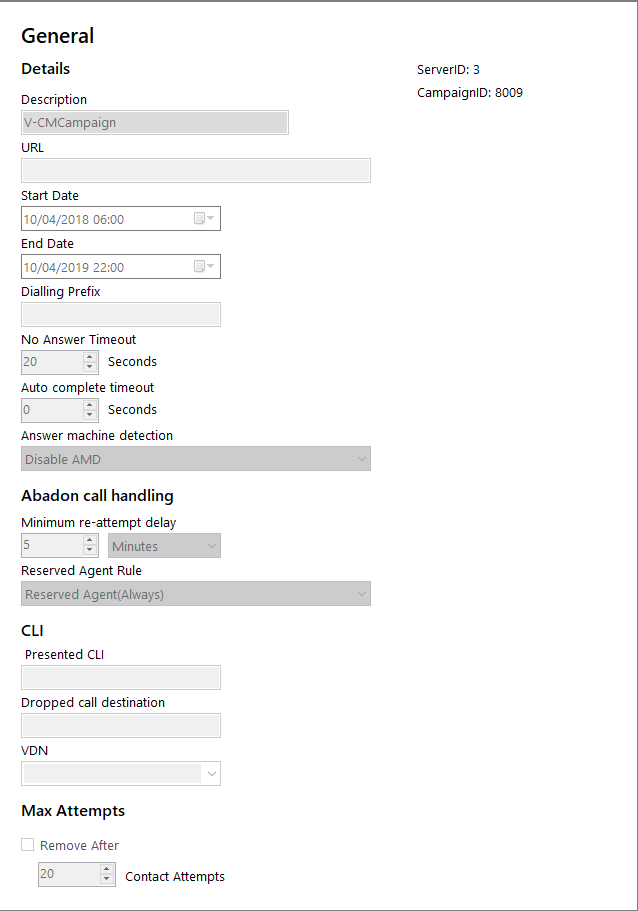
When setting up the Campaign consideration must be given to what business data is going to be imported in order to support the filtering. Choose business data fields to import that will allow the business to be able to differentiate between high-value and low-value data.
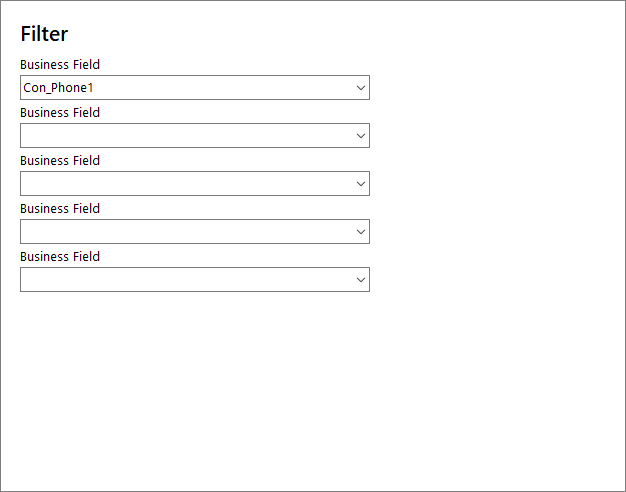
This tab is used to give labels to the 5 slots for business data in the Calls List. These labels help to identify what they are going to be used for and are also an aid when importing data to ensure that the correct information is imported into the correct slot.
- Business Fields 1 to 4: Can contain text values of up to 50 characters in length. Numeric values can also be imported into these fields.
-
Business Field 5: It is used for date/ time comparisons such as a person's date of birth, an expiry date for a contract or insurance premium. This field can only be used for holding date/ time values.
|
Warning: It is very important that once these fields have been setup that they are not changed. If one of the business field slot contains different sorts of values then the results of the filters will be very unpredictable. |
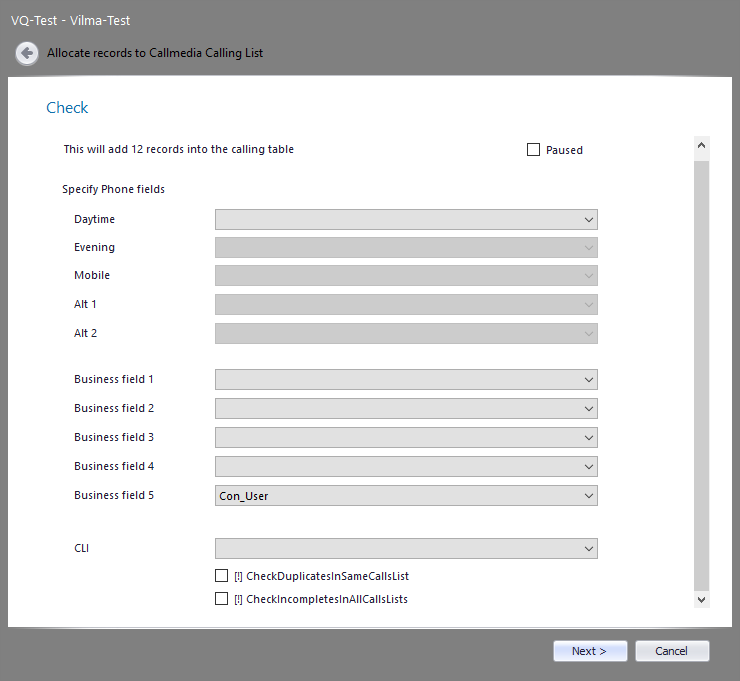
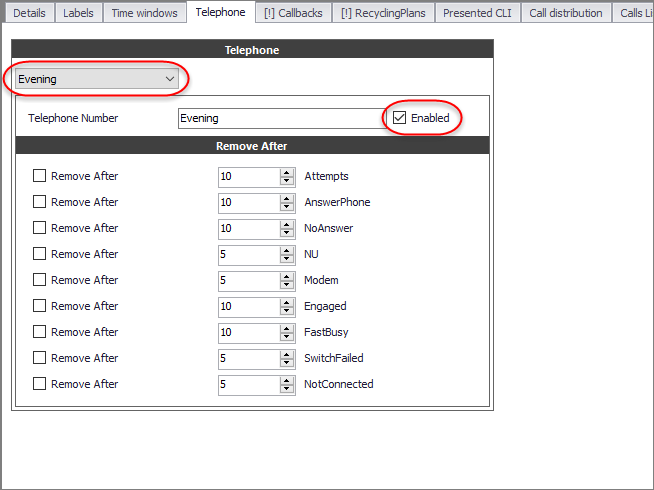
This tab allows you to:
- Activate phone fields for mapping additional phone numbers to a client during the creation of a new Callmedia Calling List.
- Set specific call attempt limits for contacts being calls on behalf of this Campaign.
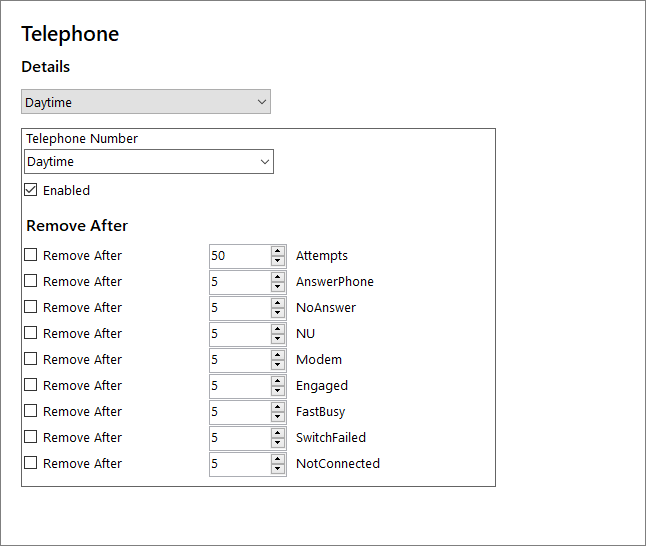
You can select removal rules for each Telephone Number and specify whether it will be removed for a particular reason and, optionally, after a given number of attempts - irrespective of the recycling reason.
|
Note: Restricting the number of attempts for some outcomes is good practice. For example, setting the maximum number of NU attempts to 2, means that NU calls quickly get removed from the system. |
This tab allows you to enable/ disable a Callback after the end date of a Campaign and to specify what action happens to it when it is unsuccessful. This can be a User (agent), Team or Personal action.
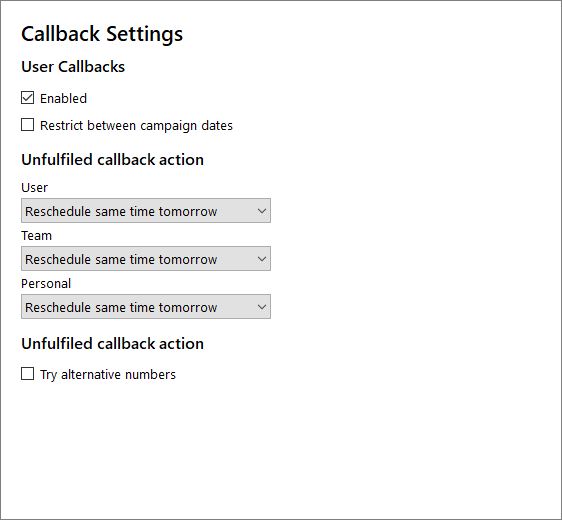
User Callbacks
- Enabled (checkbox): If this option is ticked then the 'Reschedule To Me' option will be available within Callmedia Desktop. If it is not ticked then the agent will be unable to reschedule calls to himself.
-
Restrict between Campaign dates (checkbox): If this option is ticked then agent callbacks will only be returned if they are currently inside the Campaign start and end dates. If this option is not ticked then an agent may receive Callbacks even if the Campaign has ended.
Unfulfilled callback action
If a Callback failed to be made, then as part of the midnight housekeeping these calls can be automatically rescheduled pre User, Team or Personal level. The options are as follows:
- Move call into error state: Any Callbacks that are failed will be placed into the Calls in Error list (default option). Available to User, Team and Personal.
- Reschedule same time tomorrow: The Callback time will be set for tomorrow at the same time as the original Callback time. Available to User, Team and Personal.
- Reschedule team and same time tomorrow: Removes this call from being agent specific and anybody in the Team could be assigned to the call.. The Callback time will be set for tomorrow at the same time as the original Callback time. Available to User only.
- Reschedule according to Recycle Plan: The Callback will be set for tomorrow, but at any time between 00:00:01 and 23:59:59. Available to User, Team and Personal.
- Reschedule team and according to Recycle Plan: Removes this call from being agent specific and anybody in the Team could be assigned to the call. The Callback will be set to have a start time of tomorrow, but at any time between 00:00:01 and 23:59:59. This option only applies to calls that are set to a specific time or a delta time. It does not affect callbacks to time windows. Available to User only.
All callback types
-
Try alternative numbers (checkbox): Selecting this option means that any other numbers for the contact will be attempted AFTER the number that was originally requested.
Note: Recycling rules may remove numbers in any order depending on the outcome of each dial attempt including the primary contact number. Only when all numbers are removed will the contact be removed.
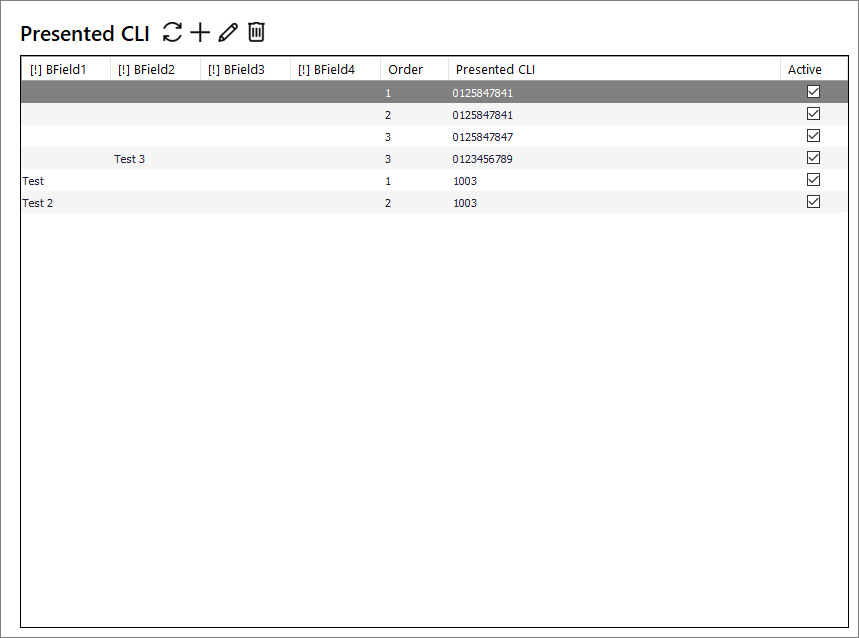
Through this tab you can manage CLI numbers for specific geographic areas by defining the relevant database fields.
The following actions are available
| Icon | Description |
|---|---|
|
|
Updates the list of CLIs |
|
|
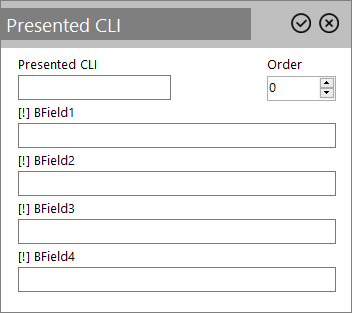
Creates a new Presented CLI.
Provide the following parameters:
Click the |
|
|
Modify the parameters of the selected Presented CLI |
|
|
Remove the selected Presented CLI from the campaign |
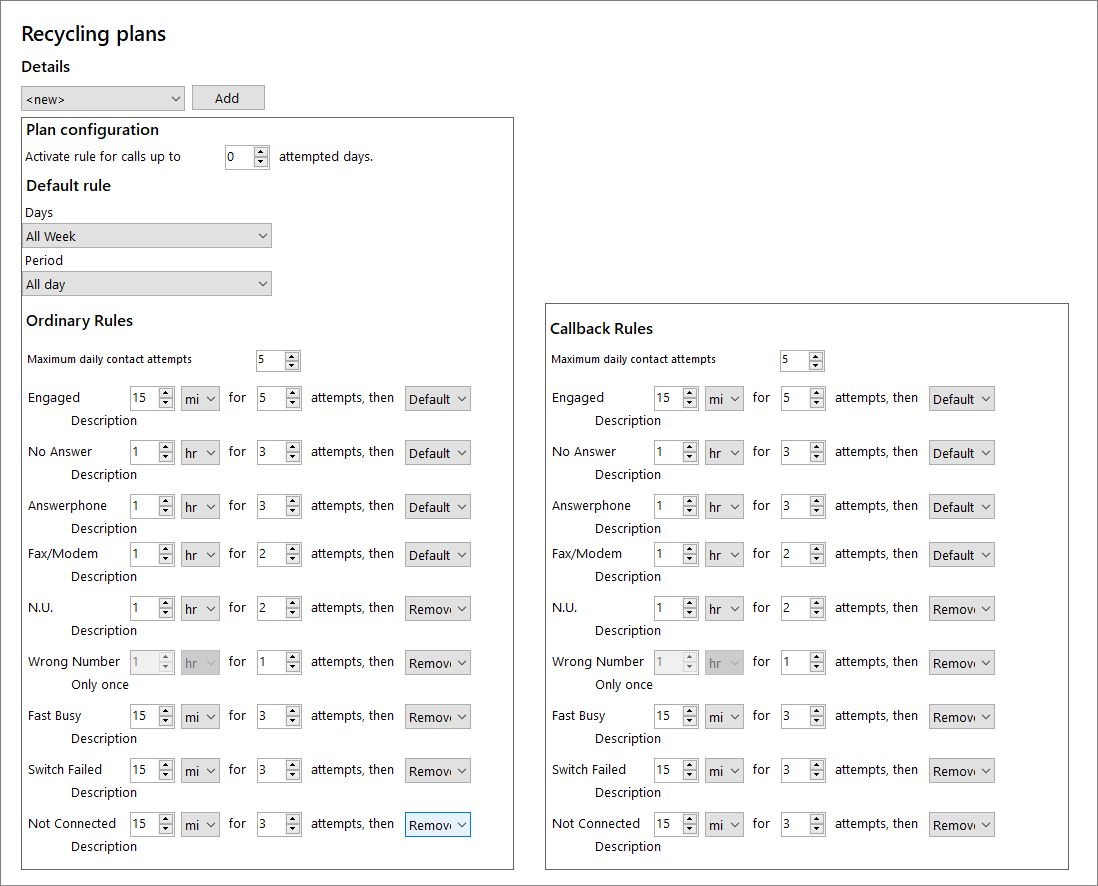
This tab defines how calls will be redialled if a call attempt has failed, for example, as a result of a no answer or engaged call attempt. The recycling rules work the same for all dialling modes; however, with predictive dialling the predictive dialler will recycle some calls automatically without the need for a User to select the recycle reason.
There are two levels of Recycling Rules: Ordinary Rules and Callback Rules. The set of rules that will be applied to the call will be selected by the number of days on which a particular call has been attempted.
Details
-
Select/ Add plan: Allows you to select an existing plan or add a new one
Note: The default plans used for Callmedia are (7 days and 30 days).
Plan Configuration
- Activate rule for calls up to: The recycling plan is set up for calls that have been attempted for up to the number of days defined in this field.
Default Rule
The following options are available for a time window in the Recycling Plan:
- Days (drop-down list): All Week, Weekday, Weekend, Monday-Sunday
- Period (drop-down list): AllDay, Morning, Afternoon, Evening
Ordinary Rules
Ordinary Rules is responsible for recycling calls for the current day only. They use time delta recycling (e.g. call again in 15 minutes, 1 hour, etc.) and they have an attempt count that will be valid for the current day only for each possible call outcome. There is also be a maximum number of call attempts.
Callback Rules
Once Ordinary Rules have expired because the call has been attempted more times than the rules allow, then these rules come into play. These offer the option to set the Callback time to a Time Window recycling rule only (e.g. recycle to Weekday Afternoon, Saturday Any Time) or to remove the call from the calls list.
This screen allows the calling hours of the Campaign to be set up. These are then used as part of call recycling or recycling rescheduled calls.
Enable the checkboxes for the required calling hours categories.
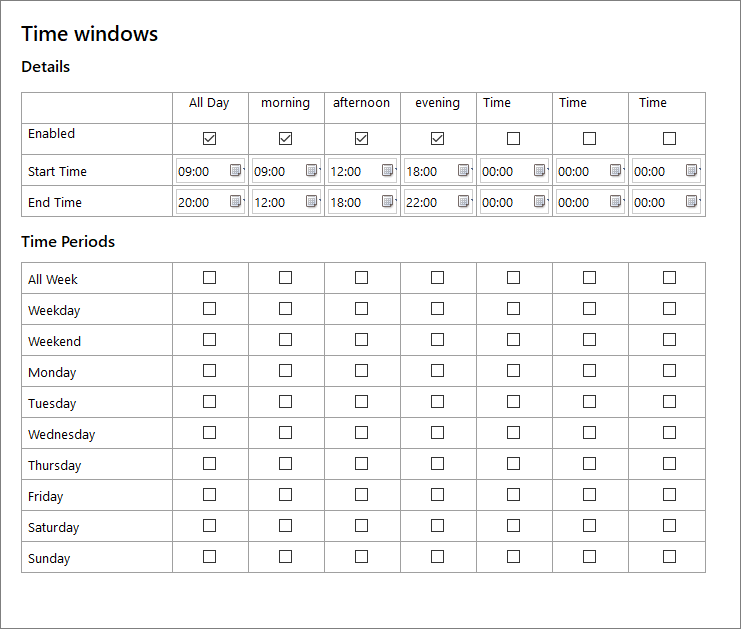
- All Day: Sets the start and end times for the whole day
- Morning: Sets the morning start and end times
- Afternoon: Sets the afternoon start and end times
- Evening: Sets the evening start and end times
- Time Windows 1-3: These custom time windows are useful for setting up non standard time windows, such as a Saturday calling period.
|
Note: These time windows cannot be configured when a Campaign is active or not active. They are only used during recycling or the setting up of a scheduled callback. |
Time Periods
- All Week, Weekday, Weekend, Monday-Sunday: These checkboxes set the window of time or 'Time Period' that calls can be recycled / rescheduled to. When the Recycling plans are set up this will enable or disable different options, these are also used when an agent tries to schedule a Callback to a specific time window.
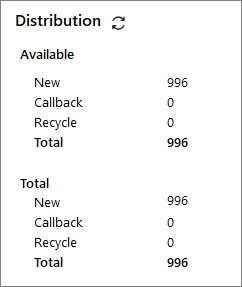
This tab shows the amount of available calling data for the campaign. The following information is shown:
- New: The number of uncalled contacts
- Callback: The total number of arranged Callbacks
- Recycle: The total number of contacts that have been attempted at least once, but have not been connected
- Total: The sum of the calling data for the campaign
The icon ![]() navigates you to the 'Call Distribution' tab of the Callmedia Teams screen for resetting all pending recycled calls to new (uncalled) status (by using the Recycle button there).
navigates you to the 'Call Distribution' tab of the Callmedia Teams screen for resetting all pending recycled calls to new (uncalled) status (by using the Recycle button there).
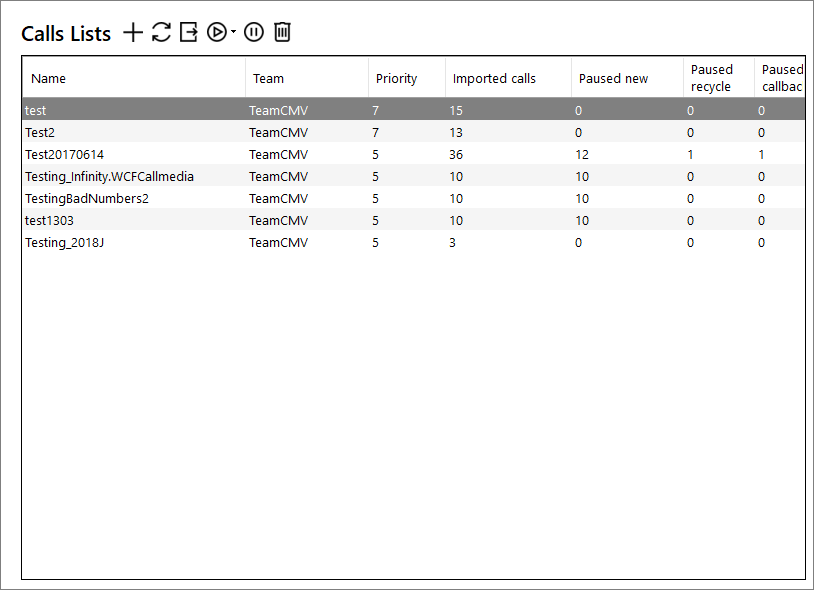
The following actions are available:
| Icon | Description | ||
|---|---|---|---|
|
|
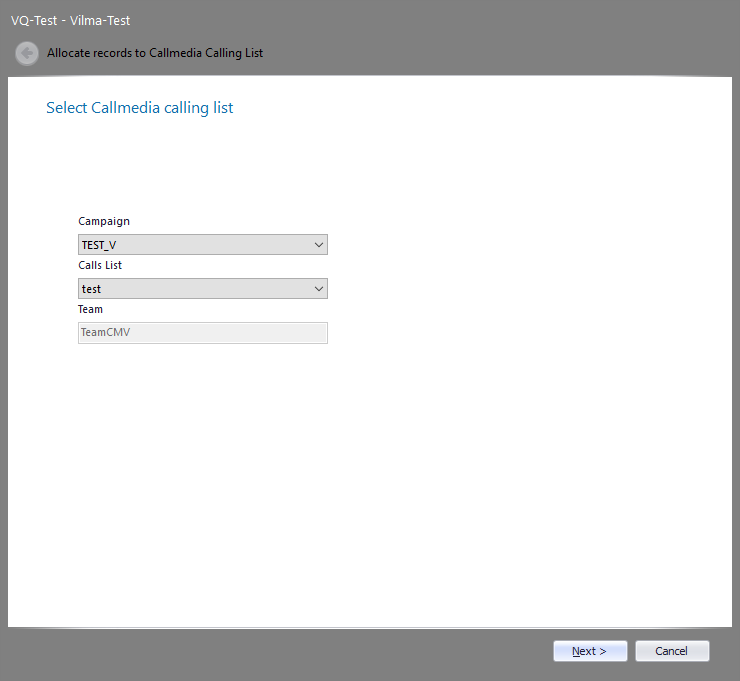
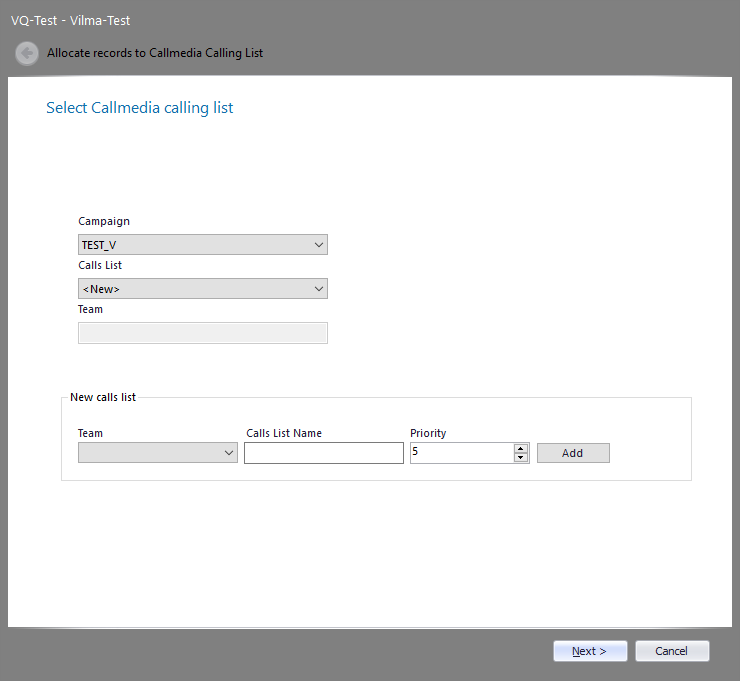
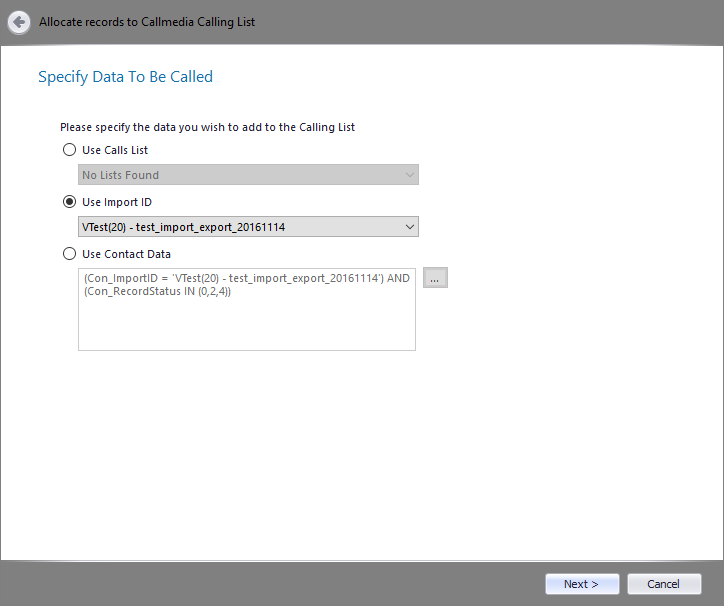
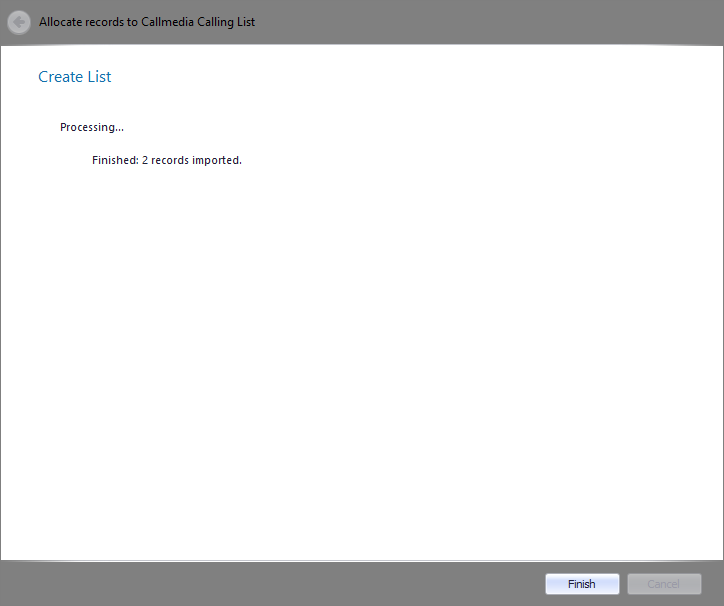
Allows you to add or import a calls list through a wizard, which opens in a new tab. To return to a previous step (when possible) within the wizard click the left arrow
|
||
|
|
Refreshes the displayed calls lists | ||
|
|
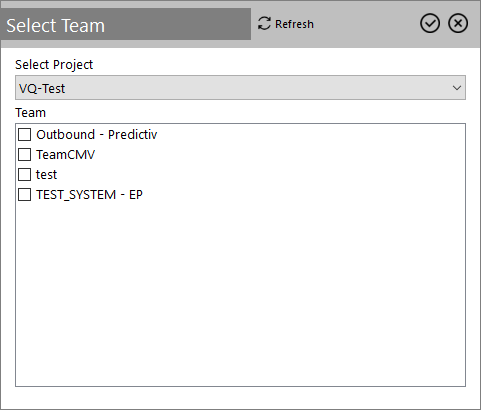
Provides a shortcut for reassigning one or more Callmedia campaigns from one team to another.
Select a project on the drop-down list, check the new team and click the Note: Each Callmedia call list can only be assigned to one team. |
||
|
|
Select the priority of the list. Calls are selected for dialling in priority order, highest priority first. | ||
|
|
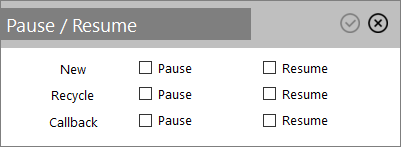
Opens a dialog box for selecting the call states that will be paused or resumed when you click the
|
||
|
|
Removes the calls list from the campaign |
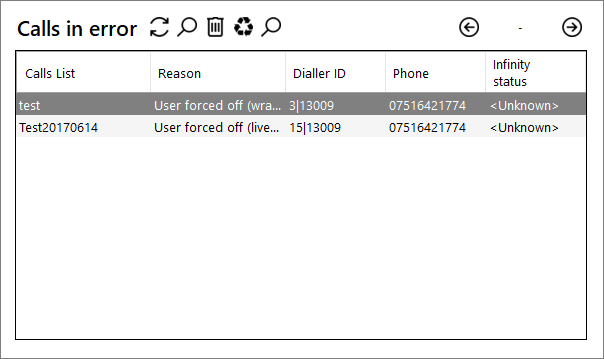
This tab displays an overview of all the calls in error for the project (calls that have been interrupted due to forced log off, PC restart etc). The following actions are available through the tab's toolbar:
| Icon | Description |
|---|---|
|
|
Refreshes the displayed calls |
|
|
Shows the status inside Infinity for each record (by default, the screen shows only the Callmedia status) |
|
|
Removes the selected call |
|
|
When a call is stuck in error, this will make the record available for dialling again |
|
|
Opens the Lead View screen, so that you can better decide to apply 'Reset to fresh' or 'Remove' to the record |
|
|
Allow you to access the additional pages of calls (if any) |
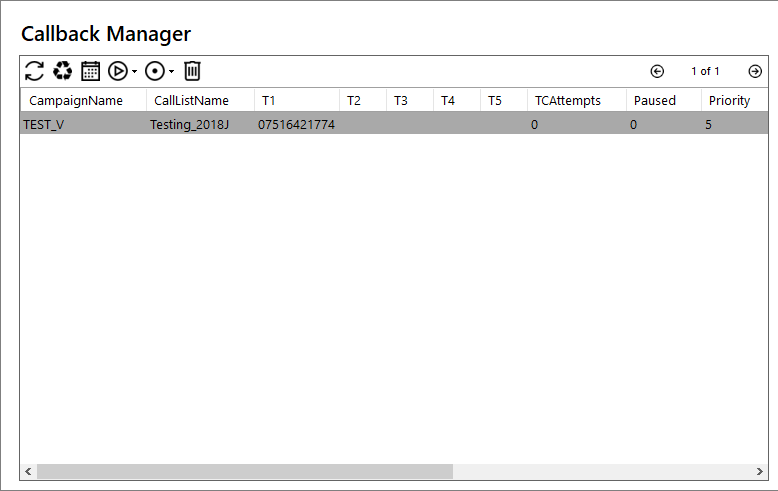
This tab shows the current status of the callbacks allowing you to reschedule them, pause/ resume them and change their order (priority). The following actions are available through the tab's toolbar:
| Icon | Description |
|---|---|
|
|
Refreshes the displayed callbacks. |
|
|
Sets the selected callback to Fresh status. |
|
|
Change the date and time of the selected callback. Click the
|
|
|
|
|
|
Allows you to set the dialling priority of the selected callback(from 1-highest to 10-lowest). |
|
|
Removes the selected callback from the calls list preventing dialling forever. |
